Wall drawing
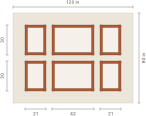
How to use it
Picture frame molding — also spelled moulding, and also called box trim or shadow-box molding — is a grid of mitered rectangles on the wall. This planner solves the box sizes, spacing and margins to fit your wall, draws the result at true proportions, and lists every long-point cut.
- 1Measure your wall. Enter the wall width and height in inches. Everything is solved and drawn inside these bounds.
- 2Choose your grid. Set the number of columns and rows, or switch an axis to Custom to give each box its own size — a wide center panel with narrower flanks, say.
- 3Set spacing and molding. Enter the gap between boxes, the margin to the wall edge, and the face width of your molding. The boxes flex to fill the wall around the fixed gap.
- 4Cut from the list. Read the mitered long-point lengths and quantities from the cut list, then download a PNG or print the plan to take to the saw.
Questions
- How do I space picture frame molding evenly?
- Enter your wall size, the number of columns and rows, and a fixed gap; the planner solves each box size so the boxes and gaps fill the wall evenly inside your margins, and draws it to scale.
- Can the boxes be different sizes?
- Yes. Switch a column or row axis to Custom and set each size individually, or tap the Center or Ends preset to seed a wide-center or emphasized-ends layout, then fine-tune.
- What length do I cut each piece?
- The cut list gives the long-point measurement for each mitered side — the length you set the saw to — with identical pieces merged and quantities totaled.
- How far apart should picture frame molding be?
- Start at 3.5 inches if you have no preference. Most picture frame molding sits between 3 and 8 inches apart, and 3.5 is popular because it is the actual width of a 1x4, so you can cut a scrap and use it as a physical spacer rather than measuring every box. Set the gap first and let the planner flex the box sizes around it.
- How many picture frame boxes should I use?
- Set a column and row count and the planner draws the boxes to scale so you can judge the proportion. As a starting point, aim for boxes near square or a gentle portrait, and keep the margin around the grid close to the gap between boxes. Consistent margins and gaps matter more than the exact count.
- Can I put picture frame molding above and below a chair rail?
- Yes, and it is a common two-tier layout. The rule of thumb is that the upper frames run about two thirds larger than the lower ones rather than matching, so switch the row axis to Custom and set the two heights directly. If you want framed panels on the lower wall only with bare wall above the rail, use the wainscoting planner instead.
- What is a long-point measurement?
- On a mitered piece the long point is the longest edge — the outer corner of the 45° cut, and the length you set your miter saw to. The cut list reports every piece by its long-point length so you can cut straight from it.
- What molding is best for picture frame trim?
- A light profile such as lattice, panel moulding or a small casing is typical. Enter its face width and the boxes and cut list update to match; the drawing shows the true proportions before you buy.
- Does it work on a phone?
- Yes. It is a single fast page that redraws live as you type, with no sign-up, and you can download a PNG or print the plan.
How to measure for picture frame molding
- Measure the wall width at several heights and use the smallest — the boxes are solved to that width, and a box sized to a wide spot binds at a narrow one.
- Measure the height of the area you want framed. Above a chair rail or baseboard, measure to those, not the whole wall.
- Set the margin to the reveal you want around the whole grid — the bare wall left between the outer boxes and the wall edge or trim.
- Plan around outlets and switches: nudge the gap or a box size so a frame does not land on one, and check the drawing before cutting.
Picture frame molding spacing & design guide
How far apart should picture frame molding be?
If you have no opinion yet, start at 3.5 inches and adjust from there. Most picture frame molding sits somewhere between 3 and 8 inches apart, and 3.5 is the number that keeps coming up for a practical reason covered below. Use the same figure for the gap between boxes and, roughly, for the margin around the outside — a grid whose outer reveal matches its inner gaps reads as deliberate, while a tight margin around wide gaps makes the boxes look like they are sliding off the wall. Leave 3 to 4 inches clear above a baseboard or below a crown so the trim does not crowd what is already there.
Pick a gap you can cut a spacer for
There is a reason 3.5 inches is so common: it is the actual width of a 1x4 (and the narrow face of a 2x4), so you can cut a scrap to length and use it as a physical spacer instead of measuring and marking every box. A 1x3 gives you 2.5 inches the same way. It is worth choosing the gap this way round, because the planner takes the gap as fixed and flexes the boxes to fill the wall around it — so a gap that matches a board you already own costs you nothing in the layout and saves an hour of marking. Set the gap first, then adjust the box count until the drawing looks right.
How many boxes, and what proportion?
A grid reads best when the boxes echo the wall — taller boxes on a tall wall, wider boxes on a long one. Start with the count that gives boxes close to square or a gentle portrait, then let the drawing judge it. What matters more than the exact count is keeping the margin and gaps consistent so the eye reads a deliberate grid. The traditional way to check a layout is to mask it out on the wall in painter’s tape before cutting anything; the drawing here is doing the same job, at true proportions, without the tape.
Two tiers, above and below a chair rail
A common variation splits the wall at a chair rail with a row of frames above and below, and the rule of thumb is that the upper frames run roughly two thirds larger than the lower ones rather than matching. That is a mixed-size layout, so switch the row axis to Custom and set the two heights directly instead of hunting for a count that happens to divide well. If you want the panels confined to the lower wall with bare wall above the rail, that is wainscoting — the planner has a dedicated mode for it.
Even boxes vs. different sizes
Most calculators only do identical boxes. This one solves identical boxes by default, but you can switch a column or row to Custom — or tap the Center or Ends preset — for a wide center panel with narrower flanks, the common look over a sofa or bed. The boxes flex around your fixed gap so everything still fills the wall.
Molding and mitered cuts
Picture frame molding is usually a light profile — lattice, panel moulding or a small casing. Each box is four pieces mitered at 45° at the corners; the cut list gives the long-point length, the longest edge of each mitered piece and the number you set the saw to. Prime or paint before assembly and the joints close up cleaner.
Before you buy the lumber
Two decisions usually remain once the layout looks right. The first is whether the pieces should all be the same size — an accent wall with different-size boxes almost always reads as more deliberate than an even grid, and the planner above will lay one out for you.
The second is what it costs. Total linear feet is only half the answer, because you cut pieces from fixed-length boards and the offcuts are usually scrap — the accent wall cost calculator packs your actual cut list onto boards and tells you how many to buy at your own price per foot. If you want the reasoning behind the piece lengths themselves, including the long-point miter math, how it works sets it out.